1. Preface
This is a small strategy guide for Edgeworld, most useful to newer players, but with some tips for the rest too.
This document may be outdated and is no longer maintained by me since I no longer play the game. If you feel like taking over, see the chapter "About this document".
2. Generic
2.1. Finding players
There are a bunch of ways to find players.
The Scout & Attack Bases screen (the little warp gate in the middle of your command panel). The Players PvP tab lists all players in your current sector. The Feuds PvP tab lists players you’ve attacked or that have attacked you. Factions PvE are computer players.
Global, alliance and group chats are another way to find players. You can click on players names to message and scout them or invite them to a group (more on that later). It is not possible to send resources to players via this menu. For that, see the Alliance method of finding players.
The Alliance screen allows you to list players in your alliance and the leaders of other alliances. In the My Alliance tab, you can click on a users name to send them messages, scout them and send them resources. This tab also lists which enemies last attacked people in your alliance, giving you an easy way to retaliate against player for the glory of your alliance.
GPS allows you to find a player by playername. They can be bought using platinum, or won in Zoot’s Loot. They can be used only ONCE per GPS.
Battle Reports received in the email from either offense or defense can be used to scout enemy bases.
2.2. Zoot’s Loot
Once a day (??is this true? I think I may have gotten it twice a day, once in the afternoon, one just after midnight, then one in the afternoon again), you will get chance to play Zoot’s Loot. Zoot offers random prizes that can include anything in the shop (??true??). Chances of getting lesser prices are higher naturally.
You will not get your prize immediately. The item you’ve won gets added to the store. You first have to find the item in the store and click the Use button before it takes effect.
3. Offense
Offense starts with scouting an enemy base. (See Finding Players for more information). Once you are scouting a base, and it is not under protection and you have warps available, you can attack by clicking the green Attack button.
The goals of attacking are:
-
Gaining XP,
-
Looting resources and/or,
-
Retaliating against players.
3.1. Analysing the base
Before you decide to attack, analyse the base and try to find any weak spots. Check the Defense chapter for spotting weak-spots in a base. Make sure you have a plan of action and know what kind of troops you want to send. In case you’re not sure whether you’ve got enough troops for your plans, check before attacking. If you find that you don’t have those four rhinos needed to carry out your plan, you must retreat and lose one or more warps.
Depending on your goals, watch out for either weak spots in an enemy’s base and / or exposed and lightly-protected resources. Weak spots can be scattered or lone defenses that may open up holes to the base’s core or defenses of the same type in the same spot. Select troops and warp-in points accordingly.
3.2. Selecting troops
You must then select troops to send by clicking on their icons. You can remove troops from the selection by clicking the small red minus icon on the troop icon. Which troops to select depends on the availability of your troops, the enemy base and where you want to attack it.
The following troops are available:
- Marines
-
Marines are dirt-cheap and fast to build, and have decent health/damage. It may seem like they don’t do much damage, and they’re the lowest level troops, yet in large numbers they’re very useful. Use to quickly take out defenses.
- Rhinos
-
Rhinos are cheap to build and have large amounts of health (at lower levels). Although they do very little damage, they are extremely useful to distract enemy defenses while other troups take them out. Two or three rhinos can often distract defenses long enough for pyro’s or specters to do a lot of damage. Warp in rhinos far away from where you want them to distract, and prepare the second warp-in with high-damage dealing close-range troups. Once the rhinos are distracting all the guns you want them to distract, warp in additional troops close to defenses to take out the defenses. Be careful when using this strategy with X-1’s though, because the splash damage from attacks they perform on rhinos can easily whipe out your forces. Use snipers in that case.
- Raiders
-
Raiders have medium health, and don’t do a lot of damage. Their strength lies in the fact that when they hit any kind of mining facility, you will receive twice the resources from that mine. One hit by the raiders is enough, other troups can destroy the building for double resources. It’s all about correct timing and warp-in placement with these troups, but they can significantly increase the spoils of war. Note that raiders will always go for turrets first, even if they’re not being attacked by one. This makes it difficult to time their warp-in precisely so that they can hit mines first.
- Pyros
-
Pyros have below-average health, but the deal a lot of damage. Use to quickly take out defenses while rhinos or titans distract them. Warp in close to defenses once they’re distracted. Easily wiped out by X-1 Cannons.
- Specters
-
Arguably the most useful kind of troops, Specters can take out targets from a large distance. They operate outside of the range of X-1 cannons and Tesla’s, allowing them to take out those units without loses. Most useful as a tactical unit dropped in to take care of X-1’s and Tesla’s, they make a good addition to a mixed group of units. Check the Appendix to see how to utilize these extremely useful units (is that too many U’s? I never can tell) to farm Fractions.
- Hornets
-
Hornets have average health and do average damage. Their attack slows the rate of fire of any defenses to 50%. Since they move at the same speed as titans and a little faster than rhinos, they make a good addition to those units. Just two hornets in your warp-in party can make the difference between losing many or few troops.
- Titans
-
Titans have very high health and are fast. They do little damage, but they are excellent to draw fire away from the rest of your troops. Well placed Titans followed by warping in a bunch of specters and perhaps a hornet or two can often result in a victory with very few loses. They are well worth their price and time to train.
- Shrikes
-
Shrike have a reasonable amount of health, but deal low damage. Their high speed often gets them killed quickly due to them outrunning all the other troops, making them not really worth the resources and time they cost.
- Disruptors
-
No information available at this time.
3.3. Warping in
After having selected your troops, you must pick the spot to warp in. This is done by moving the cursor around the battlefield and clicking it in a strategic point that is allowed. If you are not allowed to warp in at a particular spot, the cursor will be red; otherwise green.
A warp gate has a limit on how much troops you can warp in per attack. This limit is determined by the level of your warp gate, and the space used up by a unit. A Marine, for instances, uses up one space, while a Titan uses 4. That means if your warp gate has 20 spaces, you can only send four titant and four marines. It is therefor important to level up your warpgate for more powerful attacks.
When your Command Center reaches level 11, you can build a second warp-gate.
You can warp in way beyond the borders of a base. This allows certain fast troops such as rhinos to sprint ahead and take the brunt of the attack before your other troops come into range of the enemy’s defenses or to give you time to prepare for the next warp-in. Once defenses are locked on to a target, they will continue to fire until the target is dead, making rhinos and titans good cannon fodder to distract enemy defenses while you warp in more units with high damage to kill the defenses off.
It is often best to warp in as closely to defensive structures as possible, giving troops with short range but heavy firepower (such as pyros) a quick way to dispatch enemy defenses. If they have to run across the entire battlefield before reaching their intended targets they can easily be wiped out by turrets and X-1 canon’s splash damage. Hover with the mouse cursor over enemy defensive buildings to see their range and pick a good spot.
Of vital importance is that it is not necessary to warp in all troops at the same time during an attack. You can warp troops in as many times as you want, as long as the warp space hasn’t been used up. That means you can warp Rhinos in close to defenses in order to distract them while you warp in other troops in different locations to take out resources or strategic targets. Make sure you have a coherent battle plan in mind so you don’t have to think about what to do as your first wave of troops gets slaughtered.
Sometimes, however, an enemy base (both real players and Factions controlled by the computer) has exposed mines and supply depots that can be attacked with long-range troops (Specters). In that case you may want to warp in out-of-range of the defense and let your long-range troops take out the buildings.
If all your warps are charged, you get three warps. There is no way currently to increase this number, nor is there a way to build additional warp gates (even though Factions can be seen to have more than one). Attacking a Faction always costs one warp per attack. Attacking a real player takes one warp if they are offline, and two if they are currently online. That means the first attack you try on an enemy must succeed if they are online, since you cannot attack immediately again.
If a battle takes more than 5 minutes, you will automatically retreat.
3.4. Battle
Once your troops are warped in, they will move towards the building closest to them and start attacking it. If troops come under attack by defenses, that defensive building will become their next target, but not before they destroy their current target. It is therefor important to warp in in the right spot, lest your troops start shooting a useless building with lots of health, while they’re being shot at from all sides.
Enemy defenses work in much the same way. They target the first offensive unit to enter their range, and continue firing at it until it is dead. As mentioned earlier, this can be used to distract defenses using, for instance, rhinos.
3.5. Tactical retreat
There is no shame in a tactical retreat if things do not go according to plan, or if your goals have been met. Sometimes troops do not move and attack the way you intended too, and it might be better to cut your loses by retreating than to continue a pointless attack. Always carefully weigh the potential gains against the losses and if necessary, hit that retreat button.
Many valuable resources can be gotten by carefully analysing a base’s layout and attack badly defended supply depots and resource mines. Get in quick with long-range troops (Specters, for instance), take out the supply depots/mines, and retreat. Go in hard with high-damage, short-range troops such as pyros, take out some defensive buildings, plunder the mines and retreat. These are some of the methods of high return-on-investment attacks. It is not always about flattening the enemies base. Check Appendix I for a list of easy to exploit vulnerabilities in computer-controlled factions.
3.6. Double attack
Sometimes an enemy’s base is well enough protected that you cannot get through their defenses and plunder resources in one go. After an initial attack it is possible to Scout again directly and lay down a second attack. This can be used to first destroy defenses in strategic places and then sending in a second wave to loot resources or destroy the rest of the base. Varying your troops between assaults may be a good idea.
3.7. Aftermath
After attacking an enemy, they remain open to attack for a small while (??30 seconds or something??). After that, if sufficient damage has been done to their base, they will receive protection and cannot be attacked again in that timeframe. (??Need more info on this. How long does protection last? Always 30 min or until repairs are done? Damage to base required for protection???).
Both players will receive a battle report on how they did. See 'Getting Attacked' for the strategic value of this battle report.
4. Defense
4.1. Defensive buildings
Having good defensive buildings is key to staying on top of the game. Bad defenses make you an attractive target, and you will lose resources precious to getting ahead in the game. Worse, the enemy gains them over your back.
Here’s a list of the various defensive buildings and their usefulness:
-
Turrets have long range and decent firepower. Use them to cover large areas of your base. Due to their long range, they are very useful to draw in troops (see the chapter How Attacking Works for details). Their weak spot is that they can only target one enemy at a time, making it easy for enemies to send Rhinos or Titans to distract your turrets. Keep at same level as Command Center.
-
X-1 Canons have shorter ranges, and have fairly low firepower. Their strength lies in the fact that they do splash damage, dealing damage to not just the enemy they are targeting, but also those in the direct vicinity of that target. This makes them very effective against 'swarming' troops such as Marines and Piros. Keep at same level as command center.
-
Concussion turrets have long range, and reasonable firepower. When they fire at a target, there is a change (??correct??) that they slow that target down for a while. This allows other defensive capabilities to pick them off. A reasonable defense against enemies who try to use Rhinos or Titans to distract your defenses, but not for long. Keep at about two to three levels below your Command Center, unless you can spare the time and resources.
-
Tesla Towers have short range, but high firepower. Upgrading them allows them to attack multiple targets at once, making them very good short-range defenses. Use turrets to lure enemies in from long range and Tesla Towers to wipe them out. No advice on the level to keep them at, you decide.
Generic tips:
Check Section 6.2 (Appendix II) for a list of all the building upgrades.
Make sure you build all the defensive buildings you are allowed to build. How many that are depends on the level of your Command Center, so if you feel you don’t have enough defensive buildings, it’s time to upgrade your Command Center.
An important aspect is to level up your defenses. Leveling up your defensive buildings is cheap and fast, especially in the beginning. There are also various missions to be completed by upgrading defenses, providing that precious XP for leveling up.
In general you’ll want to keep your Gun Turrets and X-1 canons at the same level as your Command Center, until they are at least level 4. At lower levels (1 to 3), upgrading Tesla Towers and Concussion Turrets is less useful, since the benefits are minimal. Keep them somewhere between one and two levels lower than your Command Central, unless you can spare the resources and time to upgrade them.
4.2. Base layout
The layout of your base is as important as having high-level defensive buildings. There is no one obviously correct way to lay out your base, but here are some tips:
-
Protect resource mines and supply towers. Other buildings are less important, as you do not lose resources when they are destroyed. Insufficiently protected resource mines and supply towers make you an attractive target to enemies.
-
Overlap defenses. Each defensive building has a radius. Hover your mouse over a building to see the green circle. The more overlap these circles have, the more concentrated firepower is available in the overlap.
-
Vary defenses. Try to vary your defenses. Four Tesla tower in a single cluster without any turrets are very vulnerable to Specter offenses with their long range. Instead, vary your defenses. This way a turret can attack long-rage targets such as Specters, while an X-1 Canon can wipe out large groups of Marines or Pyros that get too close.
4.3. Getting attacked
When you are under attack from another player, you will be notified of the attack (if you are online at the moment). You cannot watch the actual battle as it progresses, but after the attack is over you will get a battle report in your mail. The battle report lists how you did in your defensive. You can hover over the blue information icons with your mouse to see which of your buildings were destroyed, what kind of troops the enemy sent and how much of them you destroyed. Use this information to your advantage by deducing weak spots in your base. If the enemy sent many Specters, and you lost a lot of resource mines or supply depots, it probably means you have a long-rage weak spot in your base. Try to find it and cover it with turrets. Much can be learned from the battle reports, so do not just ignore them.
UPDATE: The information below is no longer accurate. You are no longer attacked by the AI once a day.
About once a day you will get attacked by the AI. This is a random attack by a Faction, controlled by the computer. They are usually harmless and under-powered, and you get to delay the attack a bit so you can move some stuff around in your base in case you weren’t prepared. The AI always tries to attack the weakest spot of your base.
Before the AI attacks, you may want to delay the attack and collect the resources from your mines. This way, when your mines are destroyed, you do not lose the resources. (FIXME: Do you even lose resources from Faction attacks?)
4.4. Attack Aftermath
After having been attacked, any damaged buildings are repaired automatically. You will not lose any buildings permanently, nor will they go down levels. The only thing you can lose in an attack are resources. During repair, upgrades and mining continues like normal.
5. Resources
5.1. Getting resources
There are three ways to get resources:
-
Mine them using mining facilities.
-
Destroy enemy (PvP or PvE) resource facilities and supply depots (only PvP).
-
Trade and gift/receive resources from other members in your alliance.
5.1.1. Mining
Mining for resources is straight-forward. Build mines and upgrade them. You can get far with two mines of each type, as long as you upgrade them. There are four types of resources:
-
Crystals (Blue). Used for upgrades of all building types except Crystal Mines themselves.
-
Gas (Purple). Used for upgrades of all building types except Gas Mines themselves.
-
Energy (Yellow). Used for upgrades of Concussion turrets, Tesla towers, Warp Gates, Research Faciliies and for doing Research
-
Uranium (Green). Used for doing upgrades of X-1 Canons and for research and training troops.
A mine has both an hourly rate and a storage capacity. The hourly rate is how much the mine produces per hour. The capacity determines how much resources the mine can hold before the resources must be collected manually. This means that the higher level your mines are, the less attention you have to pay to them. A mine with capacity of 18000 and an hourly rate of 3000 can go 6 hours without you having to collect the resources.
Upgrading a mine will increase both, but storage capacity will grow much faster. Upgrading mines stays relatively cheap both resource and time-wise. Mining continues during upgrades. Building new mines seems like an attractive option, as it is very cheap and fast. The additional space they take up must be protected by defensive capabilities, however. One big advantage of upgrading mines instead of building new ones is additional storage capacity provided. Capacity increases more than production, giving you plenty of storage without having to build additional storage facilities. As always, there is no obvious best way to go, so do what works best for you.
Tips:
-
Protecting mines and storage facilities is key to a good defense. Other buildings are not important.
-
Before leveling up, collect the resources from your mines. After leveling up, all your mines will be filled to storage capacity. If your mines are already full before leveling up, you will not get any free resources from the levelling.
-
Level up your mines so that they can go longer without having to collect the resources. Don’t waste those hours you’re not playing with low-level mines that stop producing when they’re full.
-
At later levels, mining becomes inconsequential, as you will get many more resources from attacking enemy players or Factions. Don’t build too many mines, because they will make you an attractive target later on in the game.
5.1.2. PvP / PvE farming
Destroying enemy bases is an advantageous method of getting resources, provided you can minimize the loses of your troops. Many PvP players, even some at high levels, have badly defended bases where resources are up for the grabbing. But be aware that those with low-level defenses may have put more time in building up their offenses and may retaliate.
Some of the PvE (Player-vs-Environment, otherwise known as the AI, NPCs and Factions) bases have some kind of vulnerability that makes parts of their base easy targets for grabbing resources quickly. Farming PvE bases can make the difference between being low on resources and always having enough. For example, the lvl 19 Helio Legion base has a weak-spot in the North-West (upper-left) corner. The two reactors can be attacked with Specters, which can stay out of reach of the Tesla tower.
At later levels (25+), destroying enemy bases will become your main method of collecting resources.
The returns can be significant, and the risk of loosing troops is zero, if the warp-in is performed correctly. Try to find weaknesses in high-level Faction bases for larger returns. You can farm resources very quickly in this way. See Appendix 1 for a list of weak spots in Faction bases. Note that you do not get resources by destroying Supply Depots of AI players, unlike those of real players.
5.1.3. Trade
Trading resources in your alliance is a great way to get rid of excess resource of one kind while gaining resources you are low on. Ask in the alliance chat for a trade. Make sure to be clear on what you need versus what you can spare, so deals can be made quickly without confusion. Begging for resources without trading back equally is considered bad mentality. Some players continually beg for resources while giving or trading little back. They level up over the backs of their fellow players in an Alliance, and may get kicked out!
5.2. Storing resources
Some tips:
-
Upgrading supply depots will massively improve their capacities.
-
Again, upgrade your mines so they take longer to fill up. Don’t waste those hours your not playing.
-
Other players in your alliance may be willing to hold resources in storage for you. Offer them something in return to make it worth their while.
6. Leveling up
Leveling up is perhaps the main goal of the game. The three main methods of leveling up are:
-
Complete missions
-
Attack Factions
-
Attack other players
Completing missions can give you significant XP for leveling up. Destroying the Level 50 Helio and Level 250 Helio are good examples which will give you lots of XP for minimal loses. See Appendix 1 (Vulnerabilities in Faction bases) for examples.
7. Appendix
7.1. Vulnerabilities in Faction bases
This is a list of zero-risk or minimal risk vulnerabilities in faction bases if you retreat in time. Use them to your advantage to loot resources or complete missions (destroying the Command Centers).
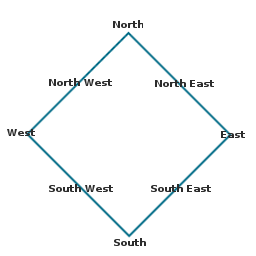
This appendix uses wind-directions to point out base weaknesses. The wind-directions and corresponding places in the enemy base can be seen in Figure III.
Notes:
-
The specters mentioned in (most of) these attacks can be level 1 specters. Send as many as you want for the zero-risk attacks, but you may want to start with one to see if you got the correct warp-in spot. In some cases, you have a very narrow spot where you can attack without getting hit. In this case it is best not too send too many specters, as they take up a larger area. The attack will take longer, but you will have zero loses with fewer specters.
-
Zero-loss means the attack can be accomplished without losing any troops, provided you got the tactics down.
-
Factions repair their base much faster than normal players, and for most of the zero-loss attacks below will not receive damage protection. If you spread your warps about 10 minutes apart, you can hit the zero-risk weakness three times in half an hour, netting for example 180,000 Uranium per hour from the level 50 Helio vulnerability.
-
While it makes for easy farming in most cases, note that you will gain more XP and resources by attacking real players or at the very least completely destroying a faction base.
The following vulnerabilities have been found and tested. If you have additional vulnerabilities, please let me know. See the Help and Contact sections on how to contact me.
- Lvl 19, Helio Legion, Zero-loss
-
Weak spot in the North. The two reactors, barracks, two tesla’s and staging area can be destroyed with Specters (lvl1) with zero loses. Warp in from the far-north, a little to the left. Retreat once the afore-mentioned buildings are destroyed. Gains: 1023 XP, 4800 Uranium.
- Lvl 25, Erazi Syndicate, Minimal-loss / Zero-loss
-
Weak spot in the South-West. With minimal losses, all the solar plants can easily be destroyed. Drop 3 rhinos in the far-South/South-West , giving you enough time to prepare the second warp-in. Once the rhinos are under attack by all defenses, warp in 4 snipers, 3 hornets and 5 marines or similar close to the turrets/teslas. Loses will probably be the two rhinoes plus about one other offensive troop. Zero-loss success has been had with 1 titan (lvl1) and the rest Specters (lvl2) a little lower. If you manage to warp in one or more Raiders at the right time and the right place, you can significantly increase your gains to about 75,000 - 85,000 energy. Gians: 1,611 to 1,856 XP, 45,600 to 85,000 Energy.
- Lvl 31, Erazi Syndicate, Minimal-loss
-
Weak spot in the East corner. The Command Center is vulnerable. FIXME. This can be used to complete the "Erazi Spaceport" mission for 50,000 Energy and 6,000 XP (once).
- Lvl 50, Maar Confederacy, Zero-loss
-
Weak spots in the North-West and the South-East. It is possible to destroy 6 of the 6 Tesla’s using Specters without losses, if your warp-in is correct. This will give you around 4108 XP. It is also possible to destroy 5 of the 6 X-1 Canons with zero losses using Specters (lvl1), but your warp-in must be exactly right. Otherwise, loses will be minimal (2, maybe 3). Warp in just left and a little under where the north turret’s range and the Concussion turret’s range overlap. Gains: XP: 3,840 to 4,108
- Lvl 50, Helio Legion Zero-loss / Minimal-loss
-
Weak spot in the North corner. The exposed reactor can be taken out with Specters (lvl1) without them getting hit. An alternative strategy is to first send in 2 rhino’s (lvl4). Once they’ve attracted the attention of the defense, quickly drop in a raider from the North corner as close to the reactor as possible. One hit to the Reactor from the Raider is enough. After that, drop in the Specters from a distance to take out the reactor for double the uranium. You will probably lose the rhinos and the raider, but at 60,000 Uranium, those are acceptable losses. Gains: 30,000 - 60,000 Uranium.
- Lvl 50, Helio Legion Minimal-loss
-
Weak spot in the south-corner. Drop three Rhinos (lvl..) in just below the warp gate. Once the Rhinos have the Tesla and Gun Turret distracted, drop in a bunch of Specters close to the warp gate. Make sure to leave enough warp-in space for another one or two Rhinos, and drop them in when the other rhinos get distroyed. The Specters will take out the defenses and will then advance into the center of the base. They can take out the Reactors and Command Center easily. Retreat once they come into range of the Gun Turrets at the top. Gains: XP: 12,444, 450,000 Uranium. UPDATE: This vulnerability has been nerfed. An incendiary turret has been added to the defenses to make it more difficult to advance with few losses.
- Lvl 100, Erazi Syndicate, Zero-loss
-
Weak spot in the West corner. The three Teslas in the West corner facing North-West can be taken out by Specters (lvl1) without losses. Warp in on the left two rocks of the rock formation in the far North-West. Gains: 3,762 XP.
- Lvl 150, Helio Legion, Zero-loss
-
Weak spot in the North corner. The barracks are weakly protected, and can be destroyed with Specters (lvl1). Gains: 1,300 XP
- Lvl 1000, Maar Confederacy
-
The level 1000 Maar base has a vulnerability in the South corner. The Staging Area can be taken out using (lvl1) Specters with zero losses. Gains: 9,090 XP.
7.2. Leveling up
-
Level 31 to 32: 667,000 XP
7.3. Building upgrades
Notes:
-
All levels require a Command Center of that level, except for the Command Center itself. So if you want to upgrade anything to level 5, you need a level 5 Command Center.
7.3.1. Command Center
| Lvl | Costs | Stats | ||||
|---|---|---|---|---|---|---|
Time |
Crystals |
Gass |
Energy |
Uranium |
Health |
|
1 |
300 |
|||||
2 |
1m |
200 |
200 |
0 |
0 |
600 |
3 |
5m |
1,000 |
1,000 |
0 |
0 |
900 |
4 |
30m |
6,000 |
6,000 |
0 |
0 |
1200 |
5 |
2h |
24,000 |
24,000 |
0 |
0 |
1500 |
6 |
15h |
200,000 |
200,000 |
0 |
0 |
1800 |
7 |
3d |
1,000,000 |
1,000,000 |
0 |
0 |
2100 |
8 |
4d |
15,000,000 |
15,000,000 |
15,000,000 |
15,000,000 |
2500 |
9 |
6d |
20,000,000 |
20,000,000 |
20,000,000 |
20,000,000 |
3000 |
7.3.2. Staging Area
| Lvl | Costs | Stats | |||||
|---|---|---|---|---|---|---|---|
Time |
Crystals |
Gass |
Energy |
Uranium |
Health |
Capacity |
|
1 |
400 |
||||||
2 |
60s |
100 |
100 |
0 |
0 |
500 |
80 |
3 |
2m |
200 |
200 |
0 |
0 |
550 |
120 |
4 |
10m |
750 |
750 |
0 |
0 |
600 |
160 |
5 |
30m |
5,000 |
5,000 |
0 |
0 |
650 |
200 |
6 |
2h |
30,000 |
30,000 |
0 |
0 |
850 |
240 |
7 |
8h |
200,000 |
200,000 |
0 |
0 |
280 |
|
8 |
1,000,000 |
1,000,000 |
0 |
0 |
320 |
||
9 |
0 |
0 |
360 |
||||
7.3.3. Barracks
| Lvl | Costs | Stats | ||||
|---|---|---|---|---|---|---|
Time |
Crystals |
Gass |
Energy |
Uranium |
Health |
|
1 |
500 |
|||||
2 |
1m |
75 |
75 |
0 |
0 |
550 |
3 |
2m |
125 |
125 |
0 |
0 |
600 |
4 |
10m |
1,000 |
1,000 |
0 |
0 |
650 |
5 |
30m |
4,500 |
4,500 |
0 |
0 |
700 |
6 |
2h |
30,000 |
30,000 |
0 |
0 |
750 |
7 |
8h |
175,000 |
175,000 |
0 |
0 |
800 |
8 |
10h |
1,000,000 |
1,000,000 |
0 |
0 |
850 |
9 |
20h |
900 |
||||
7.3.4. Warp Gate
| Lvl | Costs | Stats | |||||
|---|---|---|---|---|---|---|---|
Time |
Crystals |
Gass |
Energy |
Uranium |
Health |
Capacity |
|
1 |
0 |
100 |
10 |
||||
2 |
2m30s |
1,000 |
1,000 |
2.000 |
0 |
110 |
15 |
3 |
25m |
10,000 |
10,000 |
20,000 |
0 |
120 |
20 |
4 |
2h5m |
50,000 |
50,000 |
100,000 |
0 |
130 |
25 |
5 |
20h50m |
500,000 |
500,000 |
1,000,000 |
0 |
140 |
30 |
6 |
3d11h20m |
2,000,000 |
2,000,000 |
4,000,000 |
0 |
150 |
40 |
7 |
13d8h20m |
8,000,000 |
8,000,00 |
16,000,000 |
0 |
160 |
50 |
8 |
17d8h40m |
17,500,000 |
17,500,000 |
35,000,000 |
0 |
200 |
60 |
9 |
20d20h0m |
20,000,000 |
20,000,000 |
40,000,000 |
0 |
300 |
75 |
7.3.5. Factory
| Lvl | Costs | Stats | ||||
|---|---|---|---|---|---|---|
Time |
Crystals |
Gass |
Energy |
Uranium |
Health |
|
1 |
500 |
|||||
2 |
7m30s |
100 |
100 |
0 |
0 |
550 |
3 |
30m |
500 |
500 |
0 |
0 |
600 |
4 |
2h |
750 |
750 |
0 |
0 |
650 |
5 |
8h |
5,000 |
5,000 |
0 |
0 |
700 |
6 |
8h |
30,000 |
30,000 |
0 |
0 |
750 |
7 |
8h |
250,000 |
250,000 |
0 |
0 |
800 |
8 |
10h |
1,000,000 |
1,000,000 |
0 |
0 |
850 |
9 |
20h |
1,000,000 |
1,000,000 |
0 |
0 |
900 |
7.3.6. Tech Lab
| Lvl | Costs | Stats | ||||
|---|---|---|---|---|---|---|
Time |
Crystals |
Gass |
Energy |
Uranium |
Health |
|
1 |
100 |
|||||
2 |
2m |
400 |
400 |
800 |
0 |
120 |
3 |
5m |
1,000 |
1,000 |
2,000 |
0 |
140 |
4 |
25m |
5,000 |
5,000 |
10,000 |
0 |
160 |
5 |
8h20m |
100,000 |
100,000 |
200,000 |
0 |
180 |
6 |
20h50m |
250,000 |
250,000 |
500,000 |
0 |
200 |
7 |
1d17h40m |
500,000 |
500,000 |
1,000,000 |
0 |
220 |
8 |
3d |
12,000,000 |
12,000,000 |
24,000,000 |
0 |
240 |
9 |
11d |
15,000,000 |
15,000,000 |
30,000,000 |
0 |
300 |
7.3.7. Tesla Tower
| Lvl | Costs | Stats | ||||||
|---|---|---|---|---|---|---|---|---|
Time |
Crystals |
Gass |
Energy |
Uranium |
Health |
Damage |
Targets |
|
1 |
870 |
120 |
2 |
|||||
2 |
40m |
8,000 |
8,000 |
8,000 |
0 |
915 |
128 |
2 |
3 |
1h40m |
20,000 |
20,000 |
20,000 |
0 |
960 |
136 |
3 |
4 |
4h |
50,000 |
50,000 |
50,000 |
0 |
1005 |
144 |
3 |
5 |
10h |
130,000 |
130,000 |
130,000 |
0 |
1050 |
152 |
4 |
6 |
20h |
240,000 |
240,000 |
240,000 |
0 |
1095 |
160 |
5 |
7 |
1d9h20m |
400,000 |
400,000 |
400,000 |
0 |
1140 |
168 |
6 |
8 |
2d2h |
6,000,000 |
6,000,000 |
12,000,000 |
0 |
1350 |
250 |
6 |
9 |
3d |
12,000,000 |
12,000,000 |
24,000,000 |
0 |
1600 |
330 |
6 |
7.3.8. Gun Turret
| Lvl | Costs | Stats | ||||||
|---|---|---|---|---|---|---|---|---|
Time |
Crystals |
Gass |
Energy |
Uranium |
Health |
Damage |
Range |
|
1 |
0 |
500 |
300 |
60 |
||||
2 |
500 |
500 |
0 |
1,200 |
480 |
70 |
275 |
|
3 |
1,200 |
1,200 |
0 |
3,200 |
560 |
80 |
300 |
|
4 |
3,200 |
3,200 |
0 |
8,000 |
640 |
90 |
325 |
|
5 |
40m |
8,000 |
8,000 |
0 |
20,000 |
720 |
100 |
350 |
6 |
1h40m |
20,000 |
20,000 |
0 |
50,000 |
800 |
110 |
350 |
7 |
50,000 |
50,000 |
0 |
6,000,000 |
880 |
120 |
375 |
|
8 |
3,000,000 |
3,000,000 |
0 |
12,000,000 |
1,250 |
180 |
375 |
|
9 |
6,000,000 |
6,000,000 |
0 |
12,000,000 |
1,750 |
200 |
375 |
|
7.3.9. X-1 Cannon
| Lvl | Costs | Stats | |||||
|---|---|---|---|---|---|---|---|
Time |
Crystals |
Gass |
Energy |
Uranium |
Health |
Damage |
|
1 |
2m30s |
500 |
500 |
500 |
800 |
40 |
|
2 |
6m |
1,200 |
1,200 |
1,200 |
880 |
50 |
|
3 |
16m |
3,200 |
3,200 |
3,200 |
960 |
60 |
|
4 |
40m |
8,000 |
8,000 |
8,000 |
1,040 |
70 |
|
5 |
1h40m |
20,000 |
20,000 |
20,000 |
1,120 |
80 |
|
6 |
4h |
50,000 |
50,000 |
50,000 |
1,200 |
90 |
|
7 |
10h |
130,000 |
130,000 |
130,000 |
1,280 |
100 |
|
8 |
20h |
6,000,000 |
6,000,000 |
12,000,000 |
1,800 |
140 |
|
9 |
2d |
12,000,000 |
12,000,000 |
24,000,000 |
2,500 |
200 |
|
7.3.10. Concussion Turret
| Lvl | Costs | Stats | |||||
|---|---|---|---|---|---|---|---|
Time |
Crystals |
Gass |
Energy |
Uranium |
Health |
Damage |
|
1 |
6m |
1,200 |
1,200 |
1,200 |
0 |
600 |
80 |
2 |
16m |
3,200 |
3,200 |
3,200 |
0 |
680 |
88 |
3 |
40m |
8,000 |
8,000 |
8,000 |
0 |
760 |
96 |
4 |
1h 40m |
20,000 |
20,000 |
20,000 |
0 |
840 |
104 |
5 |
4h |
50,000 |
50,000 |
50,000 |
0 |
920 |
112 |
6 |
10h |
130,000 |
130,000 |
130,000 |
0 |
1,000 |
120 |
7 |
20h |
240,000 |
240,000 |
240,000 |
0 |
1,080 |
128 |
8 |
2d |
6,000,000 |
6,000,000 |
12,000,000 |
0 |
1,525 |
180 |
9 |
3d |
12,000,000 |
12,000,000 |
24,000,000 |
0 |
2,150 |
250 |
7.3.11. Gas Refinery
| Lvl | Costs | Stats | ||||||
|---|---|---|---|---|---|---|---|---|
Time |
Crystals |
Gass |
Energy |
Uranium |
Health |
Capacity |
Rate |
|
1 |
9s |
100 |
0 |
0 |
0 |
100 |
600 |
600 |
2 |
36s |
100 |
0 |
0 |
0 |
120 |
1,800 |
900 |
3 |
1m 30s |
150 |
0 |
0 |
0 |
140 |
4,000 |
1,320 |
4 |
5m |
850 |
0 |
0 |
0 |
160 |
8,000 |
1,980 |
5 |
30m |
6,000 |
0 |
0 |
0 |
180 |
18,000 |
3,000 |
6 |
2h |
300,000 |
0 |
0 |
0 |
200 |
35,000 |
4,500 |
7 |
6h |
3,000,000 |
0 |
0 |
0 |
220 |
100,000 |
10,020 |
8 |
24h |
4,000,000 |
0 |
0 |
0 |
240 |
250,000 |
25,020 |
9 |
2d |
6,000,000 |
0 |
0 |
0 |
260 |
400,000 |
40,020 |
7.3.12. Crystal Mine
| Lvl | Costs | Stats | ||||||
|---|---|---|---|---|---|---|---|---|
Time |
Crystals |
Gass |
Energy |
Uranium |
Health |
Capacity |
Rate |
|
1 |
9s |
0 |
100 |
0 |
0 |
100 |
600 |
600 |
2 |
36s |
0 |
100 |
0 |
0 |
120 |
1,800 |
900 |
3 |
1m 30s |
0 |
150 |
0 |
0 |
140 |
4,000 |
1,320 |
4 |
5m |
0 |
850 |
0 |
0 |
160 |
8,000 |
1,980 |
5 |
30m |
0 |
6,000 |
0 |
0 |
180 |
18,000 |
3,000 |
6 |
2h |
0 |
300,000 |
0 |
0 |
200 |
35,000 |
4,500 |
7 |
6h |
0 |
3,000,000 |
0 |
0 |
220 |
100,000 |
10,020 |
8 |
24h |
0 |
4,000,000 |
0 |
0 |
240 |
250,000 |
25,020 |
9 |
2d |
0 |
6,000,000 |
0 |
0 |
260 |
400,000 |
40,020 |
7.3.13. Solar Plant
| Lvl | Costs | Stats | ||||||
|---|---|---|---|---|---|---|---|---|
Time |
Crystals |
Gass |
Energy |
Uranium |
Health |
Capacity |
Rate |
|
1 |
9s |
50 |
50 |
0 |
0 |
100 |
600 |
600 |
2 |
36s |
50 |
50 |
0 |
0 |
120 |
1,800 |
900 |
3 |
1m 30s |
75 |
75 |
0 |
0 |
140 |
4,000 |
1,320 |
4 |
5m |
425 |
425 |
0 |
0 |
160 |
8,000 |
1,980 |
5 |
30m |
3,000 |
3,000 |
0 |
0 |
180 |
18,000 |
3,000 |
6 |
2h |
150,000 |
150,000 |
0 |
0 |
200 |
35,000 |
4,500 |
7 |
6h |
1,500,000 |
1,500,000 |
0 |
0 |
220 |
100,000 |
10,020 |
8 |
24h |
2,000,000 |
2,000,000 |
0 |
0 |
240 |
250,000 |
25,020 |
9 |
2d |
3,000,000 |
3,000,000 |
0 |
0 |
260 |
400,000 |
40,020 |
7.3.14. Reactor
| Lvl | Costs | Stats | ||||||
|---|---|---|---|---|---|---|---|---|
Time |
Crystals |
Gass |
Energy |
Uranium |
Health |
Capacity |
Rate |
|
1 |
9s |
50 |
50 |
0 |
0 |
100 |
600 |
600 |
2 |
36s |
50 |
50 |
0 |
0 |
120 |
1,800 |
900 |
3 |
1m 30s |
75 |
75 |
0 |
0 |
140 |
4,000 |
1,320 |
4 |
5m |
425 |
425 |
0 |
0 |
160 |
8,000 |
1,980 |
5 |
30m |
3,000 |
3,000 |
0 |
0 |
180 |
18,000 |
3,000 |
6 |
2h |
150,000 |
150,000 |
0 |
0 |
200 |
35,000 |
4,500 |
7 |
6h |
1,500,000 |
1,500,000 |
0 |
0 |
220 |
100,000 |
10,020 |
8 |
24h |
2,000,000 |
2,000,000 |
0 |
0 |
240 |
250,000 |
25,020 |
9 |
2d |
3,000,000 |
3,000,000 |
0 |
0 |
260 |
400,000 |
40,020 |
8. About This Document
This document is available from http://www.electricmonk.nl/Writings/HomePage in HTML, PDF and Asciidoc source format.
8.1. Copyrigth & License
This document is © Cpyright 2011, Ferry Boender.
This document may be freely distributed, in part or as a whole, on any medium, without the prior authorization of the author, provided that this Copyright notice remains intact, and there will be no obstruction as to the further distribution of this document. You may not ask a fee for the contents of this document, though a fee to compensate for the distribution of this document is permitted.
Modifications to this document are permitted, provided that the modified document is distributed under the same license as the original document and no copyright notices are removed from this document. All contents written by an author stays copyrighted by that author.
Failure to comply to one or all of the terms of this license automatically revokes your rights granted by this license
All brand and product names mentioned in this document are trademarks or registered trademarks of their respective holders.
8.2. Credits
Many thanks to the follow people of the lmao alliance for their tips and help with this document.
-
Lord Esa, for various tips
-
Venom, for various tips
-
Lloyd, for help on finding and testing Faction vulnerabilities and Appendix II
-
Ill Be Back, for various tips
-
ManBearPig, for help on finding Faction vulnerabilities and Appendix II
-
Bkins, for Faction vulnerability and Appendix II
-
Sean Forehand, pointing out document discrepancies
-
Cam Arnold, for Faction vulnerability.
-
madstork91, for Faction vulnerability updates.
-
Coolkidsback, Skyler Star, for updates on the game mechanics.
8.3. Change history
v0.9 Updates. v0.8 Updated Lvl 50 Helio vulnerability. Removed lvl 250 Helio vulnerability. v0.7 Added vulnerability of lvl1000 Maar base * v0.6 Fixed misplacement of section header (Trade) * v0.5 Added vulnerability of lvl 50 Helio base Added vulnerability of lvl 250 Helio base Updated Appendix II (upgrade costs) Fixed battle duration before automatic retreat Fixed some FIXMEs Added some info about leveling up * v0.4 Fixed appendix II Added Battle Reports as a source of finding players Fixed automatic withdraw during battle after X minutes * v0.3 Clarified Zoot’s Loot section Improvements to the PvP/PvE Farming Improvements and new vulnerabilities to Appendix I Added Appendix II, Building Upgrades * v0.2 Added appendix I: Vulnerabilities in Faction bases Improvements and updates on the 'Offense - Warping' In section Added info on the ability to warp in multiple times in a single attack * v0.1 Initial document